Brief Introduction
The gauge is using Magnetic and Eddy thickness measurement.
It can measure the thickness of non-magnetic coating layers on magnetic substrate. Such as: (aluminum, chrome, copper, enamel, rubber, paint) on magnetic substrate(steel, iron, alloy and magnetic stainless steel).
It can measure the thickness of non-metals coatings layers covered on non-magnetic metals substrate. Such as: (enamel, rubber, paint, vanish, plastic anodic-oxide layer) covered on non-nagnetic metals substrate (aluminum, brass, zinc and nonmagnetic stainless steel).
The gauge have data storage, the USB interface, it can save 1173 measuring-records, each record contains the information of measuring-results and measuring-time, it’s very useful for you to control the quality of your products.
Measuring Procedure
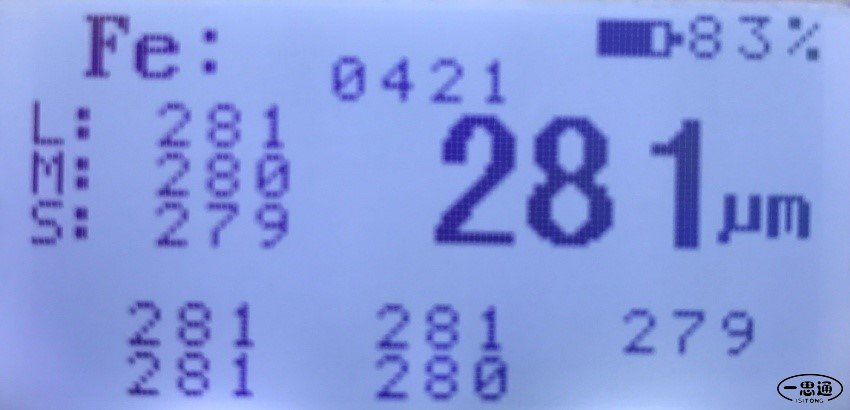
Press the “Red” key and the Display is on as bellow:
The guage is on measuring and restore the state of last operation by itself.
Place the probe onto a coating layer to be measured. The reading on the display is the thickness of the coating layer, the gauge save the record automatic and the number is added 1. When you finished a measurement and to make the next measurement, you have to lift the probe higher than 1cm.
then make the next measure.The last 5 measuring result will be shown on the bottom of the screen, and on the left, the statistical result will be shown:
-
“L” is the Max,
-
“M” is the Avg,
-
“S” is the Min.
-
When you switch off the gauge or finish the Zero adjustment, the statistical result will be clear.

Calibration
Zero adjustment:
-
Place the probe on the substrate(or an uncoated measured object) steadily. and press “red” KEY, when the display is on “CAL0 OK” and lift the probe, the Zero adjustment is finished. Attention: when you press the “red” key, pls ensure the probe is on the substrate, otherwise the Zero adjustment is failed.
-
Finished the Zero adjustment, lift the probe higher than 1cm, and to measure the substrate, if the result is around 0(±3um), the Zero adjustment is success, otherwise the Zero adjust have to be made again.
-
During the Zero adjustment, the gauge can recognize the “Fe” or “NFe” automatic, and the gauge can save the parameters automatic. The Zero adjustment need to be made if there are larger error during the measurement or change the substrate.
Adjustment:
Select an appropriate calibration foil according to your measurement range.Place the standard foil selected onto the substrate(or the uncoated standard.
Place the probe mildly onto the standard foil, if the reading is different with the foil, lift the probe and press two the “red” key continuously, the display is on “CAL+(CAL-), the gauge is on adjustment, at the time, the reading on the display can be added or modified automatic, pressing the “red” key can to change the direction of the reading, at the same time the prompts of CAL+ and CaL- are also changed. When the reading is on the display is equal with the foil, Press two the “Red” key continuously, the display is on “CALOK” with alarm, the adjustment is finished.
-
To ensure the correcting, you can test different foils to check it.
-
To ensure the stably of the gauge, in case the error operation, during the adjustment, the change of the reading should be control less than 10%.
The setting of Menu
-
When the gauge is on measuring, Press “red” key 5minutes and release, the gauge is on the Setting of Menu, the display is as bellow:The cursor loops between the four menus.
-
When the cursor is on the menu, press “red” key to operate
-
Setting timeWhen the cursor is on “set time”, Press “red” key, the display is on:
The cursor pointer can be modified, when the data is equal to the correct data, press “red” key to modify, moving the cursor to the next data and to modify, until finish the whole setting time.
Characteristic
-
Small style design, conveniently carry
-
Complete intelligentized design, easily operate
-
Rapid measure, excellent repeated performance
-
Zero adjustment, second point adjustment
-
LCD digital display
-
The metric system /England system unit transform
-
Automatic probe recognition
-
There is bee ring song prompt during operation
-
Manual or automatic shut down and accurate indication of power
-
data saving(1173)
-
time tracking, can check the time of the record
-
USB interface, the saving data can be read by U disk.
Display instruction
-
CAL 0 OK ZERO Adjustment is finished
-
CAL+(CAL-) the gauge is on Adjustment
-
Adjustment is finished
-
Fe Magnetism substrate measure state
-
NFe Non-magnetism substrate
Technology parameter
-
Range: 0-1000um
-
Power:2*AAA(CR1220)clock (CR1220)
-
Accuracy:Zero adjustment:±(3%H±1.5)two point adjustment:±【(1%~3%H)】±1.5
-
Resolution:0.1um (0~99.9um) 1um (over 100um)
-
Environment temperature: 0-40℃
-
Relative humidity: ≤85%
-
Minimum substrate:10*10mm
-
Minimum Curvature: Convex:5mm, concave:25mm
-
Thinnest substrate:0.5mm
-
weight:200g
-
Dimension:100mm*65mm*25mm
Restore factory setting
When to restore?
A. When the mis-operation or the other reasons to the gauge does not measure any more, It is recommended to restore factory setting .
How to restore?
Press two the “Red” key continuously, the gauge’s display is on: Wait……9 When the gauge finished the countdown, the restore factory setting is OK.
The gauge is a precision instrument, Please keep it in a dry\dust-free, non corrosive environment, avoid hitting or squeezing, only the correct using and maintenance, to keep te gauge’s correct measure and the using time. The probe and stand foil need to keep cleaning, and to check and clean the probe regularly, otherwise it will influence the correction of the measurement. If the gauge will not to be used for a long time, remove batteries.
Services
This instrument has one-year quality guarantee, maintenance for all life. If there are any problem of this product, please contact the dealer in time.